IoT Örnekleri
Esp32 ve Node MCU Esp8266 ile örnekler
STA Mode - AP Mode
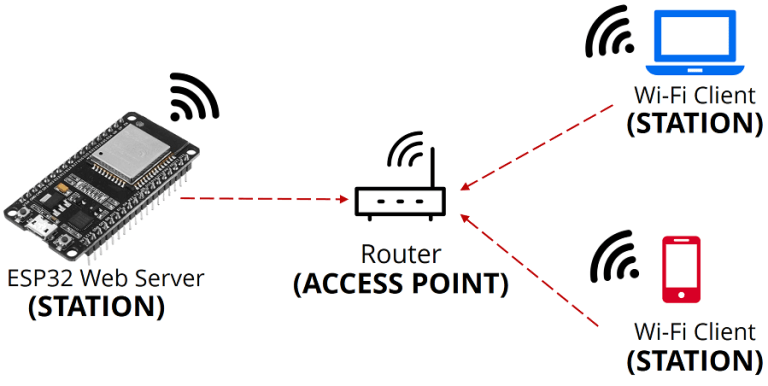
Node MCU ESP8266 ile STA Mode Örneği
#include <ESP8266WiFi.h>

const char* ssid = "**********";
const char* password = "********";

int ledPin = 2; // GPIO2 => D4 (GPIO13 ucu D7 ye karsılık gelir)
WiFiServer server(80);

void setup() {
Serial.begin(115200);
delay(10);

pinMode(ledPin, OUTPUT);
digitalWrite(ledPin, LOW);

// Wifi bağlantısı
Serial.println();
Serial.println();
Serial.print("Connecting to ");
Serial.println(ssid);

WiFi.begin(ssid, password);

while (WiFi.status() != WL_CONNECTED) {
delay(500);
Serial.print(".");
}
Serial.println("");
Serial.println("WiFi connected");

// server baslatılıyor
server.begin();
Serial.println("Server started");

// baglantı saglandıktan sonra serial monitorde bize ip adresini gösterecek
Serial.print("Use this URL to connect: ");
Serial.print("http://");
Serial.print(WiFi.localIP());
Serial.println("/");

}

void loop() {
// bir client istemci baglı olup olmadığını kontrol ediyoruz
WiFiClient client = server.available();
if (!client) {
return;
}

// client ın bir data gondermesini bekliyoruz
Serial.println("new client");
while(!client.available()){
delay(1);
}

// gelen istekleri okuyoruz
String request = client.readStringUntil('\r');
Serial.println(request);
client.flush();

int value = LOW;
if (request.indexOf("/LED-ACIK") != -1) {
digitalWrite(ledPin, HIGH);
value = HIGH;
}
if (request.indexOf("/LED-KAPALI") != -1) {
digitalWrite(ledPin, LOW);
value = LOW;
}

// bu kısımda html kodlarını internet arayüzüne yazdırıyoruz.

client.println("HTTP/1.1 200 OK");
client.println("Content-Type: text/html");
client.println("");
client.println("<!DOCTYPE HTML>");
client.println("<html>");
client.print("<meta name='viewport' content='width=device-width, initial-scale=1, shrink-to-fit=no'>");
client.print("Led suanda: ");

if(value == HIGH) {
client.print("ACIK");
} else {
client.print("KAPALI");
}
client.println("");
client.println("<a href=\"/LED-ACIK\"\"><button>ledi yak </button></a>");
client.println("<a href=\"/LED-KAPALI\"\"><button>ledi sondur </button></a>");
client.println("</html>");

delay(1);
Serial.println("Client disonnected");
Serial.println("");

}
.ino dosyası için tıklayın.
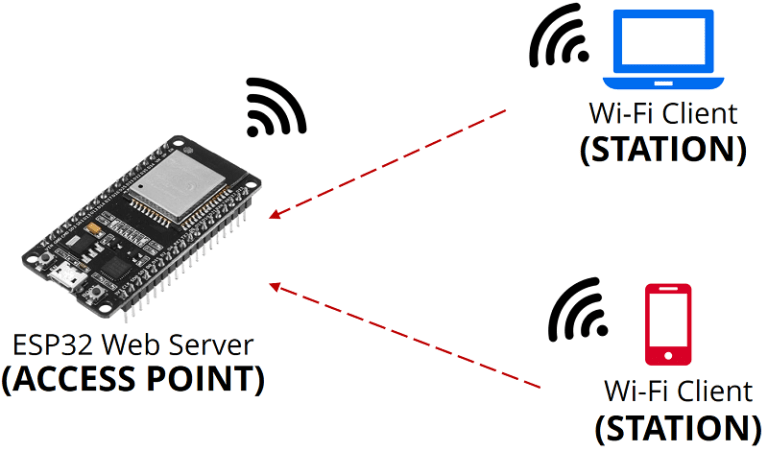
ESP32 ile AP Mode Örneği
/*
  WiFiAccessPoint.ino creates a WiFi access point and provides a web server on it.

  Steps:
  1. Connect to the access point "yourAp"
  2. Point your web browser to http://192.168.4.1/H to turn the LED on or http://192.168.4.1/L to turn it off
     OR
     Run raw TCP "GET /H" and "GET /L" on PuTTY terminal with 192.168.4.1 as IP address and 80 as port

  Created for arduino-esp32 on 04 July, 2018
  by Elochukwu Ifediora (fedy0)
*/

#include <WiFi.h>
#include <WiFiClient.h>
#include <WiFiAP.h>

#define led 17   // Set the GPIO pin where you connected your test LED or comment this line out if your dev board has a built-in LED
#define buzzer 16

// Set these to your desired credentials.
const char *ssid = "ESP32-APMode";
const char *password = "12345678";

WiFiServer server(80);


void setup() {
  pinMode(buzzer, OUTPUT);
  pinMode(led, OUTPUT);
  Serial.begin(115200);
  Serial.println();
  Serial.println("Configuring access point...");

  // You can remove the password parameter if you want the AP to be open.
  WiFi.softAP(ssid, password);
  IPAddress myIP = WiFi.softAPIP();
  Serial.print("AP IP address: ");
  Serial.println(myIP);
  server.begin();

  Serial.println("Server started");
}

void loop() {
  WiFiClient client = server.available();   // listen for incoming clients

  if (client) {                             // if you get a client,
    Serial.println("New Client.");           // print a message out the serial port
    String currentLine = "";                // make a String to hold incoming data from the client
    while (client.connected()) {            // loop while the client's connected
      if (client.available()) {             // if there's bytes to read from the client,
        char c = client.read();             // read a byte, then
        Serial.write(c);                    // print it out the serial monitor
        if (c == '\n') {                    // if the byte is a newline character

          // if the current line is blank, you got two newline characters in a row.
          // that's the end of the client HTTP request, so send a response:
          if (currentLine.length() == 0) {
            // HTTP headers always start with a response code (e.g. HTTP/1.1 200 OK)
            // and a content-type so the client knows what's coming, then a blank line:
            client.println("HTTP/1.1 200 OK");
            client.println("Content-type:text/html");
            client.println();

            // the content of the HTTP response follows the header:
             // Display the HTML web page
            client.println("<!DOCTYPE html><html>");
            client.println("<head><meta name=\"viewport\" content=\"width=device-width, initial-scale=1\">");
            // CSS to style the on/off buttons
            // Feel free to change the background-color and font-size attributes to fit your preferences
            client.println("<style>html { font-family: Helvetica; margin: 0px auto; text-align: center;}");
            client.println(".button, .button2 {border: none; color: white; padding: 16px 40px;");
            client.println("text-decoration: none; font-size: 30px; margin: 2px; cursor: pointer;}");
            client.println(".button {background-color: #4CAF50}");
            client.println(".button2 {background-color: #dd0000}</style></head>");
            // Web Page Heading
            client.println("<body><h1>ESP32 Web Server</h1>");
            client.print("<p><a class=\"button\" href=\"/H\">Led On</a></p>");
            client.print("<p><a class=\"button2\" href=\"/L\">Led Off</a></p>");
            client.print("<hr>");
            client.print("<p><a class=\"button\" href=\"/B\">Buzzer On</a></p>");
            client.print("<p><a class=\"button2\" href=\"/N\">Buzzer Off</a></p>");
            client.println("</body>");
            client.println("</html>");
            // The HTTP response ends with another blank line:
            client.println();
            // break out of the while loop:
            break;
          } else {    // if you got a newline, then clear currentLine:
            currentLine = "";
          }
        } else if (c != '\r') {  // if you got anything else but a carriage return character,
          currentLine += c;      // add it to the end of the currentLine
        }

        // Check to see if the client request was "GET /H" or "GET /L":
        if (currentLine.endsWith("GET /H")) {
          digitalWrite(led, HIGH);               // GET /H turns the LED on
        }
        if (currentLine.endsWith("GET /L")) {
          digitalWrite(led, LOW);                // GET /L turns the LED off
        }
        if (currentLine.endsWith("GET /B")) {
          digitalWrite(buzzer, HIGH);                // GET /L turns the LED off
        }
        if (currentLine.endsWith("GET /N")) {
          digitalWrite(buzzer, LOW);                // GET /L turns the LED off
        }
      }
    }
    // close the connection:
    client.stop();
    Serial.println("Client Disconnected.");
  }
}
.ino dosyası için tıklayın.
Önemli Not: ESP32 ile çalışırken karta yükleme başladığı anda BOOT tuşu basılı tutulurken EN tuşuna kısaca basılıp bırakılır ve sonra BOOT tuşu da bırakılır. Bu işlem yapılmazsa yükleme hatası alınır.
Alev ve Su Sensörü ile kontrol programı(Arduino örneği)
void setup() {
pinMode(2,OUTPUT);
pinMode(4,INPUT);
Serial.begin(9600);
}

void loop() {
  Serial.println(digitalRead(4));
  Serial.println(analogRead(A0));
 if(digitalRead(4)==false or analogRead(A0)>150){
  digitalWrite(2,HIGH);
  }
  else{
    digitalWrite(2,LOW);
    }
}
.ino dosyası için tıklayın.
esp8266AP_ModeAP_ledBuzzerV2.ino dosyası için tıklayın.
Arduino IoT platformu için aşağıdaki bağlantıdan gerekli kurulum yapılmalıdır.
ARDUINO CREATE AGENT (download)
Arduino IoT Cloud Remote (mobil uygulama)
AP modunda led ve buzzer kontrolü için aşağdaki mobil uygulamayı kurup kullanabilirsiniz.